Cloud Stacking Backlinks, Advantages & How To Make it

Cloud Stacking Backlinks are a less conventional but powerful off-page SEO technique. These links involves using high-authority cloud platforms like Google Drive, Amazon AWS, Microsoft Azure, or other cloud-based services to publish and interlink your content, creating a network of backlinks that point to your money website. These backlinks can significantly improve your site’s visibility in search engine rankings.
They are more like guest post article and these 12 links are more powerful than 100s of general backlinks like forum, blogs comments, etc. At Rank n Thrive agency, we make these links for almost all of our clients and it works for majority of niches.
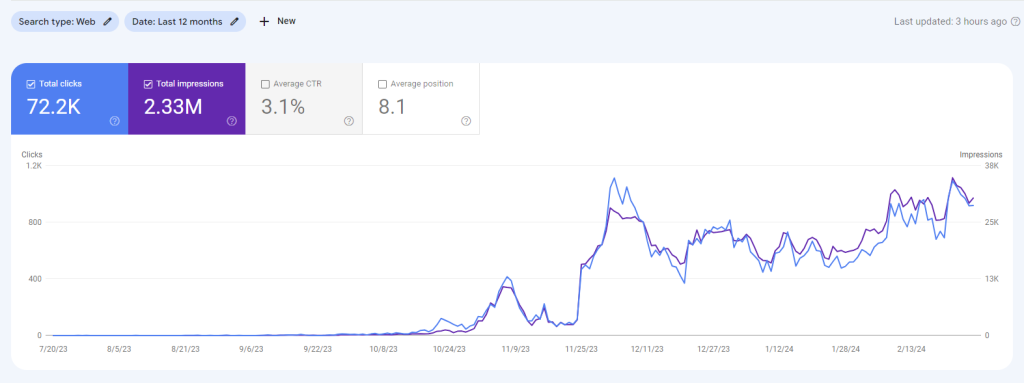
We have achieved the below result in one of our client’s site in a short time by making these cloud backlinks. Do you want to see this for your site? Read below

How Does It Work?
- Content Creation: You create SEO-optimized content (PDFs, documents, spreadsheets, or webpages) hosted on cloud platforms.
- Internal Linking: The content links to other content that will hosted on different cloud platform, forming a “stack.”
- External Linking: The content also includes backlinks to your main website or target pages.
- Platform Authority: Since cloud platforms are highly trusted by search engines, the backlinks gain authority and credibility.
Benefits of Cloud Stacking Backlinks:
- High Authority Links: Leverages trusted platforms with high domain authority.
- Cost-Effective: Many cloud services offer free or low-cost plans. In our guide below, we’ll teach you about the free cloud platforms available
- Fast Indexing: Content hosted on cloud platforms gets indexed quickly.
- Works for all: Works well for local SEO, niche websites, and competitive industries.
Step-by-Step Guide On How To Make Cloud Stacking Backlinks Absolutely Free
Here’s a simple, step-by-step guide to creating backlinks using the cloud stacking technique on seven powerful platforms.
1. Amazon AWS (DA 96)
- Sign Up for an Amazon AWS Account
Create an account on Amazon AWS. - Access S3 Bucket
Go to the S3 console. - Create a Bucket
- Click “Create Bucket.”
- During setup, untick the option “Block all public access.”
- Scroll to the bottom and complete the bucket creation process.
- Update Bucket Permissions
- On the bucket dashboard, go to Permissions.
- Under Bucket Policy, click Edit and then Policy Generator.
- Set the policy type to S3 Bucket Policy and:
- Enter
*(asterisk) in the Principal field. - Select GET OBJECT in Actions.
- Add the ARN (bucket ARN with
/ *at the end) in the appropriate field.
- Enter
- Click Add Statement, generate the policy, and save it.
- Upload Your HTML File
- Create a simple HTML file containing your backlink.
- Upload it to your bucket.
- Once uploaded, click the file, and copy the Object URL.
- Test Your Link
Test the URL on another device to confirm it’s live.
2. Google Cloud (DA 97)
- Sign Up for Google Cloud
Create an account and search for “Create a Bucket.” - Create a Bucket
- Select Cloud Storage > Create Bucket.
- Name your bucket, skip other settings, and continue.
- Upload Your HTML File
Upload the same HTML file used for Amazon AWS. - Set Public Permissions
- Go to Permissions.
- Under New Principals, enter AllUsers.
- Select Storage Object Viewer under roles and grant public access.
- Copy the Public URL
Click on your uploaded file and copy the public URL.
3. GitHub (DA 96)
- Create a Repository
Sign up Github and create a new repository with a name of your choice. - Upload Your HTML File
- Click Upload an existing file and upload your HTML file.
- Commit the changes.
- Enable GitHub Pages
- Go to Settings > Pages.
- Change the branch from None to Main, and save.
- Access Your Page
Your page will be live within a few minutes with a public URL.
4. Heroku (DA 79)
- Create an App
Sign up Heroku and click Create an App.
Choose a name and submit. - Deploy Using GitHub
- Set GitHub as the deployment method.
- Upload a PHP file to a GitHub repository.
- Connect your GitHub repository to Heroku and deploy.
- Access Your Link
Once the deployment is complete, your link will be live!
5. Backblaze (DA 79)
- Create a Bucket
Sign up Backblaze and create a public bucket. - Upload Your HTML File
- Upload your file to the bucket.
- Copy the Friendly URL.
- Access Your Link
Your page is live and accessible using the Friendly URL.
6. Netlify (DA 93)
- Sign Up
Create an account on Netlify. - Upload Your HTML File
Drag and drop your HTML file onto Netlify. - Customize the URL
- Go to Site Settings.
- Change your site name.
- Access Your Link
Your link is live instantly!
7. Vercel (DA 90)
- Sign Up
Create an account on Vercel. - Add New Project
- Log in to your account.
- Click Add New on the dashboard and select Project.
- Import Git Repository
- Connect your GitHub or GitLab account.
- Choose Import Git Repository.
- Upload HTML File
- If no repository exists, click Skip Git Repository to deploy manually.
- Drag and drop your HTML file into the deployment area.
- Access Live Site
After deployment, your live site URL will be available in the Preview section. - Customize URL (Optional)
- Go to Project Settings > Domains.
- Add a custom domain if needed.
8. Cloudflare (DA 94)
- Sign Up
Create an account on Cloudflare Pages. - Create a Project
- Click Create a Project.
- Connect your GitHub or GitLab repository containing your HTML file.
- Upload HTML File (If No Repository Exists)
- Create a GitHub repository.
- Upload your HTML file to the repository.
- Begin Setup
- Select the repository in Cloudflare Pages.
- Click Begin Setup.
- Configure Project Details
- Set the build command (leave blank if not required).
- Specify the output directory (if applicable).
- Deploy the Site
Click Deploy to start building your website. - Access Your Live Site
After deployment, your site will be live at a Cloudflare Pages URL (e.g.,projectname.pages.dev).
9. Bitbucket (DA 81)
- Sign Up
Create an account on Bitbucket. - Create a Repository
- Click Create Repository.
- Name your project and set the visibility to Public.
- Upload HTML File
- Use the Add File button to upload your HTML file.
- Click Commit Changes to save your file.
- Enable Bitbucket Pages
- Navigate to Repository Settings > Bitbucket Pages.
- Enable Pages and select the branch where your HTML file is located.
- Access Your Live Link
A live link will be generated (e.g.,username.bitbucket.io/projectname).
10. W3Spaces (DA 75)
- Sign Up
Create an account on W3Spaces. - Create a Space
Click Create Space and name your project. - Upload HTML File
- Navigate to the Files section.
- Drag and drop your HTML file into the uploader.
- Save Changes
Save your changes after uploading. - Access Your Live Link
Find your live link in the Preview section (e.g.,username.w3spaces.com/filename.html).
11. Codeberg (DA 73)
- Sign Up
Create an account on Codeberg. - Create a Repository
- Click New Repository.
- Name your project and set it to Public.
- Upload Your HTML File
- Use the Upload File button to upload your HTML file.
- Commit the changes after uploading.
- Enable Pages Hosting
- Go to Repository Settings > Pages Settings.
- Set the branch to Main and save the changes.
- Access Your Live Link
Your live link will be:username.codeberg.page/repositoryname.
12. Gitlab (DA 96)
1. Create a Project
- Sign up Gitlab and create a blank public project.
2. Upload Your HTML File
- Add your file using the + icon.
- Create a new file named
.gitlab-ci.ymland paste the following code as it is:
pages:
stage: deploy
script:
– mkdir .public
– cp -r * .public
– mv .public public
artifacts:
paths:
– public
only:
– main
3. Commit Changes and Check Pipelines
- Commit the changes.
- Under Pipelines, ensure it shows Pass.
4. Access Your Page
Use the format: yourusername.gitlab.io/repositoryname.
Feeling too much technical and difficult to make? Do not worry, feel free to reach out to us and we will make it for you as low las $99.
Contact us at ranknthrive@gmail.com
